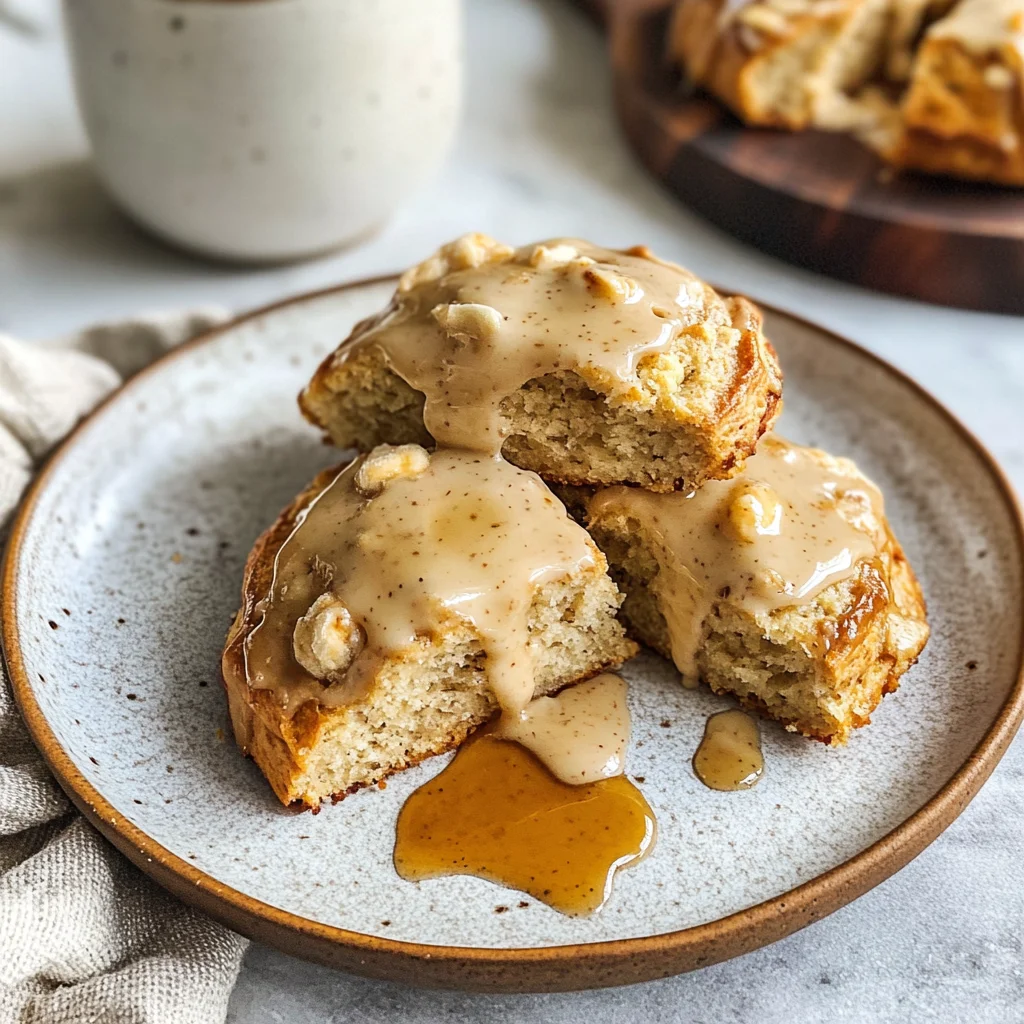
Imagine the warm, inviting aroma of freshly baked Banana Bread Scones wafting through your kitchen, their golden-brown tops glistening with a hint of melted butter. With each bite, you’ll experience a delightful contrast between the tender, moist crumb and the subtle crunch of a perfectly baked exterior, making them an ideal companion for a cozy breakfast or an afternoon snack that embraces feelings of home and comfort.
What sets these Banana Bread Scones apart is the perfect balance of ripe bananas and aromatic cinnamon, creating a flavor profile that dances on the palate. Enhanced with just a touch of sweetness, they are delicious on their own or served alongside a dollop of creamy butter or rich honey. Dive into this recipe and discover how easy it is to bring warmth and joy to your table with these irresistible treats.
Why You’ll Love This Banana Bread Scones
You’ll fall head over heels for these Banana Bread Scones because they effortlessly blend the comforting flavors of traditional banana bread with the delightful texture of a scone. The combination of all-purpose flour and baking powder creates a tender crumb that melts in your mouth, while the hint of cinnamon adds a warm, inviting aroma that fills your kitchen as they bake. With every bite, you’ll experience the natural sweetness from ripe bananas and a buttery richness that makes them an irresistible choice for breakfast or an afternoon snack. Plus, feel free to personalize them with chocolate chips or walnuts for an extra layer of indulgence. Don’t wait—these scones are calling your name!
What Kind of All-Purpose Flour Should I Use?
For this Banana Bread Scones recipe, it’s best to use all-purpose flour, as it strikes the perfect balance between protein content and versatility. This type of flour provides just enough structure to support the scones while keeping them moist and tender, which is essential when you’re incorporating mashed bananas. If you find yourself out of all-purpose flour, you can substitute it with a combination of whole wheat flour and all-purpose or even a gluten-free blend, but be mindful that these alternatives may alter the texture slightly—resulting in denser scones. Adjusting the liquid content may also be necessary; keep an eye on the dough’s consistency to achieve that delightful scone texture.
Ingredients for the Banana Bread Scones
Each ingredient in this dish plays an essential role in flavor and texture. Here’s what you’ll need:
2 cups all-purpose flour: Provides the structure for tender scones.
1 tablespoon baking powder: Ensures a light and fluffy rise.
1/2 teaspoon baking soda: Balances acidity from the bananas for optimal texture.
1/2 teaspoon salt: Enhances the overall flavors of the scones.
1 teaspoon ground cinnamon: Adds a warm, cozy spice that complements the bananas.
1 cup mashed ripe bananas (about 2-3 bananas): Infuses natural sweetness and moisture.
1/4 cup granulated sugar: Sweetens the scones while balancing banana flavor.
1/4 cup unsalted butter (melted): Contributes richness and a tender crumb.
1 large egg (beaten): Binds the ingredients together for a cohesive dough.
1 teaspoon vanilla extract: Adds depth and enhances the sweetness.
1/2 cup chocolate chips (optional): Provides indulgent bursts of chocolate flavor.
1/2 cup walnuts (chopped, optional): Introduces a delightful crunch and nutty taste.
How To Make This Recipe

Preheat the Oven and Prepare the Baking Sheet
Preheat your oven to 400°F (200°C) to ensure it’s hot enough to give your scones a nice rise. While the oven is warming, line a baking sheet with parchment paper to prevent sticking and make cleanup easier.
Whisk Together Dry Ingredients
In a large mixing bowl, combine 2 cups of all-purpose flour, 1 tablespoon of baking powder, 1/2 teaspoon of baking soda, 1/2 teaspoon of salt, and 1 teaspoon of ground cinnamon. Whisk these ingredients together until they are well mixed and evenly distributed, ensuring that there are no lumps for a smooth dough.
Mix Wet Ingredients
In a separate bowl, mash 1 cup of ripe bananas (about 2-3 bananas) until smooth. Then add in 1/4 cup of granulated sugar, 1/4 cup of melted unsalted butter, 1 beaten large egg, and 1 teaspoon of vanilla extract. Stir these wet ingredients together until fully combined; the mixture should be somewhat thick but free of any banana chunks.
Combine Dry and Wet Mixtures
Pour the banana mixture into the bowl with the dry ingredients. Gently stir them together until just combined; be careful not to overmix, as this can lead to tough scones. If you’re using optional add-ins like chocolate chips or chopped walnuts, fold them in carefully at this stage.
Shape the Scones
Turn the dough out onto a floured surface and knead it gently just until it comes together. Pat the dough into a circle about 1 inch thick; this thickness is key for even cooking. Use a sharp knife to cut it into wedges or a biscuit cutter for round scones—both shapes will work beautifully.
Bake Until Golden Brown
Transfer your shaped scones onto the prepared baking sheet and place them in the preheated oven. Bake for 15-20 minutes, watching closely for that perfect golden brown color on top. They should be lightly firm to the touch when done; if you insert a toothpick into one and it comes out clean, they’re ready!
Cool on Wire Rack
Once baked to perfection, remove the scones from the oven and let them cool on a wire rack for a few minutes before serving warm. This cooling period allows them to set properly while maintaining their delightful moisture inside.
How to Serve and Store Banana Bread Scones
These delicious banana bread scones yield four generous servings, making them perfect for a cozy breakfast or afternoon snack. For an enticing presentation, serve them warm on a rustic platter, perhaps dusted with a sprinkle of powdered sugar, alongside a dollop of whipped cream or a drizzle of honey. Pairing them with a hot cup of coffee or tea enhances their moist, cinnamon-kissed flavor, creating a comforting experience that’s hard to resist.
To store any leftovers, place the scones in an airtight container and keep them in the fridge for up to three days. When you’re ready to enjoy them again, simply reheat in the oven at 350°F (175°C) for about 5-10 minutes until warmed through; this helps maintain their delightful texture without drying them out. While these scones can be frozen for longer storage, be aware that the texture may change slightly upon thawing, so they’re best enjoyed fresh.
What to Serve With Banana Bread Scones
Greek Yogurt with Honey
Creamy Greek yogurt drizzled with honey adds a tangy contrast that enhances the sweetness of the banana bread scones.
Roasted Sweet Potatoes
The caramelized edges of roasted sweet potatoes provide a delightful sweetness and a satisfying texture that pairs wonderfully with the scones.
Cinnamon Sugar Toast
Toasting bread and sprinkling it with cinnamon sugar creates a crunchy, sweet companion that echoes the flavors already present in the scones.
Spinach Salad with Apples
A fresh spinach salad topped with crisp apple slices offers a refreshing crunch that balances the moistness of the banana bread scones.
Buttermilk Biscuits
Flaky buttermilk biscuits bring a rich, buttery flavor that complements the cinnamon notes while adding an irresistible melt-in-your-mouth quality.
Chocolate Chip Cookies
Indulging in chocolate chip cookies alongside banana bread scones delivers an extra layer of sweetness that any dessert lover would adore.
Can I use whole wheat flour instead of all-purpose flour? Whole wheat flour can be used, but it may result in denser scones. If you want a lighter texture, consider using half all-purpose flour and half whole wheat flour for a good balance.
Are these banana bread scones gluten-free? Unfortunately, this recipe is not gluten-free as it contains all-purpose flour. However, you can substitute the all-purpose flour with a gluten-free blend designed for baking to make them gluten-free.
Can I make these scones ahead of time and freeze them? Yes, you can freeze the unbaked scones. After shaping them, place them on a baking sheet in the freezer until firm, then transfer to a freezer bag. Bake from frozen, adding a few extra minutes to the baking time.
How do I know when my scones are done baking? The scones are done when they turn golden brown on top and have risen nicely. You can also insert a toothpick into the center; if it comes out clean or with just a few crumbs, they are ready.
Can I add other flavors or spices to the scone mixture? Absolutely! You can experiment with additional spices like nutmeg or ginger for different flavor profiles. Adding citrus zest, such as lemon or orange, can also brighten up the taste of your scones.
Do I need any special equipment to make these scones? No special equipment is required; just basic kitchen tools like mixing bowls and a baking sheet will suffice. A pastry cutter or knife can help shape the dough if you prefer not to use your hands.
Conclusion
These Banana Bread Scones are not just a treat; they’re a delightful way to start your day or enjoy a cozy afternoon snack with their deliciously moist texture and hint of cinnamon. If you’re looking for more comforting delights, try our [Cinnamon Roll Muffins] or [Chocolate Chip Banana Bread] for equally satisfying flavors. We’d love for you to save this recipe on Pinterest and share your baking results with us in the comments—let’s celebrate our love for good food together!
Banana Bread Scones
Ingredients
Method
- Preheat your oven to 400°F (200°C). Line a baking sheet with parchment paper.
- In a large mixing bowl, whisk together the flour, baking powder, baking soda, salt, and cinnamon.
- In another bowl, mix the mashed bananas, sugar, melted butter, beaten egg, and vanilla extract until well combined.
- Pour the wet ingredients into the dry ingredients and stir until just combined. If using, fold in chocolate chips or walnuts.
- Turn the dough onto a floured surface and knead gently. Pat into a circle about 1 inch thick. Cut into wedges or use a biscuit cutter.
- Place the scones on the prepared baking sheet and bake for 15-20 minutes or until golden brown.
- Allow the scones to cool on a wire rack for a few minutes before serving warm.


Leave a Comment