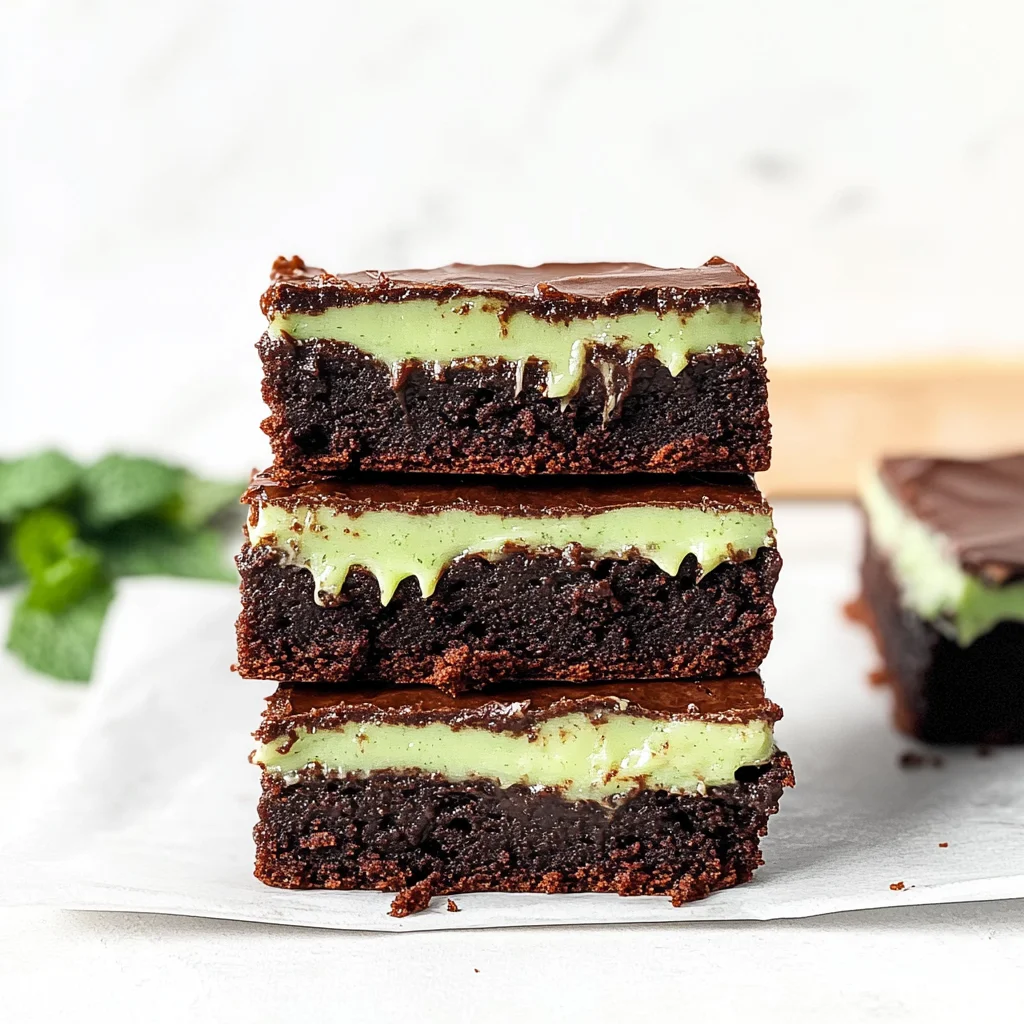
Indulge in the decadent allure of Mint Brownies, where each bite delivers a sumptuous blend of fudgy richness and invigorating mint that dances on the palate. The glossy, dark chocolate surface glistens invitingly, while the aroma of fresh mint wafts through the air, creating a comforting atmosphere perfect for cozy gatherings or a sweet escape after a long day.
What elevates these Mint Brownies is the luxurious layer of creamy mint frosting that crowns each piece, offering a delightful contrast to the dense brownie base. With their vibrant green hue and elegant presentation, these treats are not just desserts; they are a celebration of flavor that beckons both friends and family to savor every moment together. Experience the joy of baking and sharing this exquisite treat that invites warmth into your home.
Why You’ll Love This Mint Brownies
These Mint Brownies are an exceptional treat that perfectly balances rich chocolate flavor with a refreshing burst of mint. The brownie base, made with melted unsalted butter and velvety cocoa powder, boasts a fudgy texture that melts in your mouth, while the addition of eggs and sugar creates an irresistible sweetness that enhances every bite. Topped with a creamy mint frosting, this dessert not only pleases the palate but also delights the eyes with its vibrant color and glossy finish. Each piece offers a delightful contrast between the soft brownie and the smooth frosting, making them the perfect indulgence for any occasion. You won’t be able to resist whipping up a batch of these decadent Mint Brownies tonight!
What Kind of Unsalted Butter Should I Use?
For this Mint Brownies recipe, it’s best to use unsalted butter that is fresh and of good quality. Unsalted butter allows you to control the saltiness of your brownies, which is crucial for balancing the rich chocolate and refreshing mint flavors. The fat content in unsalted butter also contributes to a moist and fudgy texture, ensuring your brownies come out rich and decadent. If you only have salted butter on hand, simply reduce the added salt in the recipe by half to avoid overpowering the other flavors.
Ingredients for the Mint Brownies
Each ingredient in this dish plays an essential role in flavor and texture. Here’s what you’ll need:
Brownie Base
1 cup granulated sugar: Sweetens the brownies and enhances their rich flavor.
1/2 cup unsalted butter (melted): Provides moisture and a luscious texture.
2 large eggs: Binds the ingredients together and adds richness.
1 teaspoon vanilla extract: Infuses warmth and depth to the chocolate flavor.
1/3 cup unsweetened cocoa powder: Delivers a rich, chocolatey taste that defines the brownies.
1/2 cup all-purpose flour: Gives structure and stability to the brownie base.
1/4 teaspoon salt: Balances sweetness and enhances overall flavor.
1/4 teaspoon baking powder: Helps the brownies rise slightly for a perfect texture.
Mint Frosting
1/2 cup unsalted butter (softened): Creates a creamy base for the frosting.
2 cups powdered sugar: Sweetens and thickens the frosting to a smooth consistency.
2 tablespoons milk: Adds creaminess and helps achieve the desired frosting texture.
1 teaspoon peppermint extract: Provides a refreshing mint flavor that complements the brownies.
- Green food coloring (optional): Adds a fun, festive touch to your mint frosting.
How To Make This Recipe

Preheat and Prepare the Pan
Preheat your oven to 350°F (175°C) and prepare a 9×9 inch baking pan by greasing and flouring it well. This step is crucial for ensuring that your brownies don’t stick to the pan. Make sure the grease is evenly spread, and you’ll have a smooth release once they’re baked.
Combine Butter and Sugar
In a mixing bowl, combine the melted butter and granulated sugar. Mix them together until the mixture is smooth and well blended, creating a glossy base for your brownies. This should take about 1-2 minutes, and you want to make sure there are no sugar granules left visible.
Mix in Eggs and Vanilla
Add the two large eggs and one teaspoon of vanilla extract to your butter-sugar mixture. Beat everything together until it achieves a smooth consistency with a slightly lighter color. This process will take another 1-2 minutes, ensuring that all ingredients are fully incorporated.
Whisk Dry Ingredients
In a separate bowl, whisk together the unsweetened cocoa powder, all-purpose flour, salt, and baking powder. Mixing these dry ingredients thoroughly will help avoid any lumps in your brownie batter, which is important for achieving that rich, fudgy texture.
Combine Wet and Dry Ingredients
Gradually add the dry ingredient mixture to the wet ingredients while stirring gently. Mix until just combined; be careful not to overmix as this can lead to denser brownies. The batter should look thick but smooth without any dry flour spots.
Pour Batter into Pan
Pour the brownie batter into your prepared baking pan, spreading it evenly across the surface with a spatula. Take care to ensure an even layer so that all parts bake uniformly. This step is essential for achieving those perfect edges we love in brownies.
Bake Until Perfectly Set
Place the pan in the preheated oven and bake for 25-30 minutes. You’ll know they’re done when a toothpick inserted into the center comes out clean or with just a few moist crumbs attached. The edges should look slightly puffed and set while the center remains soft but not jiggly.
Beat Butter for Frosting
In another mixing bowl, beat the softened butter until it becomes creamy and airy. This usually takes about 2-3 minutes on medium speed. A well-creamed butter base ensures that your frosting will have that light and fluffy texture everyone loves.
Add Sugar and Milk Gradually
Gradually incorporate powdered sugar along with two tablespoons of milk into the creamed butter. Continue mixing until everything is smooth and fluffy—this can take another 2-3 minutes at medium speed. If it feels too thick, you can add a bit more milk to reach your desired consistency.
Flavor with Mint Extract
Finally, add one teaspoon of peppermint extract and green food coloring if desired to create that festive minty hue. Mix until everything is well combined; this should only take about 30 seconds. The frosting should be vibrant in color with a strong mint aroma at this stage.
Cool Brownies Completely
Once baked, remove the brownies from the oven and let them cool completely in the pan on a wire rack for about 20 minutes or until they are at room temperature. Cooling them completely is key before adding frosting; otherwise, you risk melting it away.
Frost Evenly
Spread your freshly made mint frosting evenly over the cooled brownies using an offset spatula or knife. Aim for an even layer so every bite has that delicious creamy topping. Be generous but ensure it’s spread out smoothly without clumps.
Cut into Squares
Once frosted, use a sharp knife to cut your brownies into squares of desired size—usually around 20 pieces works best for sharing! Clean your knife between cuts if you want neat edges; this gives each piece an appealing presentation when served up to friends or family.
How to Serve and Store Mint Brownies
This recipe yields four indulgent servings of mint brownies that are best enjoyed fresh. For an exquisite presentation, serve them on a white plate drizzled with chocolate sauce and garnished with fresh mint leaves. Pairing these brownies with a scoop of vanilla ice cream creates a delightful contrast in temperature and texture that enhances the rich mint flavor.
To store any leftovers, place the brownies in an airtight container and keep them in the refrigerator for up to one week. When you’re ready to enjoy them again, reheat the brownies gently in the microwave for about 10-15 seconds, just until warm, to preserve their fudgy texture. While these treats can be frozen for longer shelf life, be aware that the texture may slightly change upon thawing, so it’s best to enjoy them fresh when possible.
Creamy Mashed Potatoes
The rich, buttery texture of creamy mashed potatoes provides a delightful contrast to the sweet mint flavor of the brownies.
Roasted Brussels Sprouts
The caramelized edges and earthy flavor of roasted Brussels sprouts perfectly balance the sweetness of Mint Brownies.
Garlic Knots
Soft and chewy garlic knots add a savory touch that complements the chocolatey richness of the brownies while enhancing their indulgence.
Spinach Salad with Balsamic Vinaigrette
A fresh spinach salad drizzled with tangy balsamic vinaigrette offers a refreshing cleanse to the palate after each decadent brownie bite.
Sweet Potato Fries
The natural sweetness and crispy texture of sweet potato fries provide a satisfying crunch that pairs beautifully with the fudgy brownies.
Chocolate Chip Cookie Dough Dip
This unexpected pairing brings an extra layer of chocolatey goodness that harmonizes well with the minty undertones in the brownies.
Can I use coconut oil instead of butter in the brownie base? Using coconut oil is a great alternative to butter; just make sure it’s melted and measured using the same amount. This will give your brownies a slightly different flavor, but they will still be rich and delicious.
Are these mint brownies gluten-free? To make these brownies gluten-free, simply substitute the all-purpose flour with a 1: 1 gluten-free flour blend. This ensures that you maintain the right texture while accommodating those who need to avoid gluten.
Can I prepare the mint brownies ahead of time and freeze them? Yes, you can freeze these mint brownies after they have cooled completely. Wrap them tightly in plastic wrap and then in aluminum foil, and they should last up to three months in the freezer. Just thaw at room temperature before serving.
How do I know when my brownies are done baking? To check for doneness, insert a toothpick into the center of the brownies; it should come out clean or with just a few moist crumbs attached. If it comes out with wet batter, they need more time in the oven.
Can I add nuts or other candies to the brownie batter? Absolutely! You can fold in chopped nuts or chocolate chips into the brownie batter before baking for added texture and flavor. Just be mindful not to overmix once you add these ingredients for best results.
Conclusion
There’s something truly special about Mint Brownies; the deliciously rich chocolate combined with a refreshing mint flavor and creamy frosting makes them a delightful treat for any occasion. If you’re looking for more sweet inspirations, be sure to explore [Chocolate Mint Cookies] and [Mint Chocolate Chip Cheesecake], both perfect companions to these brownies. We’d love to see your creations, so save this recipe on Pinterest and share your baking adventures with our community!
Mint Brownies
Ingredients
Method
- Preheat the oven to 350°F (175°C). Grease and flour a 9x9 inch baking pan.
- In a mixing bowl, combine melted butter and sugar. Mix well.
- Add eggs and vanilla extract, mixing until smooth.
- In another bowl, whisk together cocoa powder, flour, salt, and baking powder.
- Gradually add the dry ingredients to the wet ingredients, mixing until just combined.
- Pour the brownie batter into the prepared baking pan and spread evenly.
- Bake in the preheated oven for 25-30 minutes or until a toothpick inserted comes out clean.
- In a mixing bowl, beat the softened butter until creamy.
- Gradually add powdered sugar and milk, mixing until smooth and fluffy.
- Add peppermint extract and food coloring (if using), mixing until well combined.
- Once the brownies are baked, remove from the oven and let cool completely in the pan.
- Spread the mint frosting evenly over the cooled brownies.
- Cut into squares and serve.

Leave a Comment